Shouse, barndominium, or pole barn home all describe a post-frame structure with living quarters and an attached garage or workshop space. These barns have gained popularity, and many of us have saved pictures of what we want our dream barndominium to look like on our Pinterest boards.
On the other hand, you might still be dreaming of your perfect pole building but need to know where to start. You may have a rough idea of your building plan, but you want to ensure you check all the boxes before building. If you find yourself in either one of those situations, you have come to the right place.
The Ultimate Guide to Building a Barndominium breaks down each step of the building process so that you can build with confidence, ensuring you get the dream home you’ve always wanted without any hidden surprises.

Before we start, there are three questions we need you to think about honestly.
- Are you mechanically inclined?
- What is your budget for the project?
- What are your project must-haves?
Often, people assume that pole barn homes are cheaper to build, that they can build a barndominium however they want, that finishing a pole barn is the same as a home, and that building a pole barn is easy.
Each post-frame project is unique, and you may have a buddy whose dad is a carpenter who built a small pole barn home for $100K, so you think you can, too. The truth is, there are many factors that go into a pole barn home's pricing, including how much work you do yourself, what design choices you make, and how much you are willing to spend.
Below, we will debunk the top four pole barn misconceptions. While we understand there are people out there who make claims about building cheaper, we have over 60 years of post-frame construction experience and will outline what we see on most post-frame projects, so that you can build with confidence.
Pole Barn Homes Are Cheaper
Many people believe pole barn homes are cheaper than stick-built homes. And often, that is untrue. Remember those questions we asked? Those play a role in your overall project cost.
 For example, if you are a weekend warrior who can watch a YouTube video and DIY your way through projects, you can build a DIY pole barn home kit for roughly $225,000-$300,000, depending on the project size and features. But remember that it does not include land or other additional costs you may incur while preparing your site.
Now, if you are like most of our customers, they want a high-quality post-frame home but prefer to finish the interior themself, they can expect to pay roughly $350,000-$400,000. Dividing what you can physically tackle yourself and financially subcontracting out the more complex or code-required elements will help keep your budget lower.

Many customers save money by being their own general contractor. As the age-old saying goes, time is money. You must be realistic about how much time you must devote to your project.
Can you leave work early if your contractor runs into problems? Our customers often want to save money by being their own general contractor, but they soon realize how much value a seasoned professional would add to their project. If balancing your time is already a constraint, then finding someone who can manage your project might be the best option for you.

Or maybe you are a customer who would rather not tackle any DIY project and would prefer to hire professional experts to take care of everything for you (also known as turn-key construction). This customer might also still be deciding between a stick-built home versus a barndominium and needs guidance on how to navigate that process.
While both offer customization, typically, if you think it looks pretty, it will cost more money than just a simple barn. You must consider what is a must-have and prioritize the overall square footage you need and fundamentals over what finishes might be out of style next decade to avoid breaking the bank.
Typically, a turn-key pole barn home costs between $250 - $400 per square foot or $500,000 - $600,000 for an average-sized pole barn home.
Build Out
A common misconception about pole barn homes is that the sky's the limit. While some counties have fewer restrictions, there are still building codes and permits to uphold when building.
For example, each county may have different foundation requirements. Our Project Sales Consultants and in-house engineers will help you find the height and overall size of the structure that will fit your needs and satisfy local codes.
Wall Cavities
The wall cavities in a traditional stick-built home are different, thus impacting how the interior is finished. In a traditional home, studs are run every 16" or 24" on-center, while post-frames are run every 8' on-center. This results in fewer materials and more design flexibility.
I f you've watched home improvement shows over the years, you may have heard the term load-bearing. That refers to a wall required to support the home's weight structurally. In post-frame construction, clear-span trusses carry the weight to the columns that go into the ground.
When you run electrical, depending on your local code, you can run your wires along the girts and avoid having to drill into studs. Thus saving time and money in labor and avoiding structurally impacting your studs.
Without load-bearing walls, you can design a more open-concept floor plan. Post-frame construction has several pros and cons, and the wall cavities are definitely a pro. However, not all subcontractors may be familiar with the differences in post-frame.
Post-Frame Is Easy
It can be easy to assume that post-frame construction is easy. But every builder is different. Some post-frame builders are turn-key. Many build the shell, and subcontractors, or you, the customer, finish the inside.
With our QLYFT Building System, we can erect a building faster than most post-frame builders. We typically have a low lead time compared to the Amish and other competitors. We have had customers finish and move into their pole barn home within 9-12 months after signing their contract.
There are a lot of details and moving parts when it comes to construction sites. Every episode of a home improvement show is full of change orders, material being delayed, something going wrong, and going over budget on at least one thing.
After reading this blog, you might discover that a pole barn home is not for you.
When financing a pole barn home, you must first identify the square footage you will need. This amount needs to be split between living and shop space. While we all want to have a nice place to come home to, it is important that you make a plan and reach out to your lender to ensure you have a realistic budget.
A barndominium can range from $150-400+ a square foot.
How Much Does a Pole Barn Home Cost?
As stated above, a pole barn home has a wide range. That is due to the finishes and how much of your project is subcontracted. If you keep your residence very basic and want your shop attached, a pole barn house can be a great option. If you do many high-end finishes inside and out, a barndominium can be the same, if not more than, a stick-built home.
First, determine whether you want a 1500-square-foot barndominium or 3,000+ square feet of living space. Depending on your pole barn's width, length, and height, there are several ways to save money.
The age-old saying "time is money" is important to remember. While there can be things worth doing yourself to save money, how much time do you have for your project, and how much will your bank loan allow you to do yourself?
Pole Barn Financing Options
Now that you understand that a barndominium is not a cheaper alternative but provides design flexibility and DIY opportunities, your next step is investigating financing.
Whether this is your first time buying a home or you are a seasoned home buyer, financing a barndominium is getting easier, but there are still several hurdles to overcome.
A barndominium loan can be very lengthy compared to traditional home construction loans. More documents are required as banks dig deep with appraisals to ensure the pole barn home's value aligns with what they are lending. It is also worth noting that lenders are more likely to give a loan to a reputable pole barn construction company since they can trust their product.
You might want to do as much as you can yourself to save money, but some loans and lenders will limit what you can do yourself. Lenders want to ensure your project gets completed, so we will break down some things you must provide before you walk into your local lender.
Loan Types
It’s important to recognize that there are different types of loans from which to choose. First, you need to identify what type of loan you will need. We’ve detailed the different loan options below.
Land Loan
If you still need the land or money to buy it outright, you may need a separate loan for the land. Some lenders will make a loan for the entire process, and others will require separate loans.
Construction Loan
Typically, a one-year loan is for the construction process and costs.
Permanent Loan
This will pay the remaining costs and set your new monthly payment based on the amount remaining on the construction loan plus the traditional loan on the property itself.
Loan Requirements
Most loans will only cover 80% of the total barndominium construction costs. You will need to decide on your floor plan and finishes, gather estimates for each component of the building process, and provide standard documents most loans require. Below, we outline what you need to gather for a lender.
|
Land |
Build |
Self |
|
The date you acquired the land |
Square feet of finished living area, by level (main floor, 2nd floor, basement) |
Photo Identification (driver's license, passport, photo ID card, Military ID) |
|
The amount you paid for the land, if any |
Square feet of unfinished area (garage/shop) |
Proof of income |
|
Your estimated market value of the land |
Square feet of covered porch and/or portico |
Two recent years of tax returns & W2’s |
|
Your current loan balance, if any |
An estimate from a general contractor |
Recent bank statements |
|
The number of acres |
Local Barndominium Comps (ask your PSC or Zillow) |
Each lender may have stipulations about the building process. Verify the following with your lender.
- Can you be your own general contractor?
- Can you live on the property while construction is underway?
- Are professionals required (for electricity, plumbing, etc.)?
- Can you do your own finish work (painting, laying floor tile, installing trim work, hanging cabinet work, and fixtures)?
- Will you need separate loans for construction and the permanent mortgage?
Down Payment
When it comes to loans, you typically need 20% down. Each loan is different, and the amount you will be approved for is based on your assets, liabilities, and credit score.
With the rise in living costs and inflation, it can be hard to save money for a down payment on your project. You can use cash for your down payment, but you can also use equity. Equity can come from your current residence or the property on which you plan to build your new home.
There are many options for financing pole barn homes, and it can be an overwhelming process to decide who to use. To help you get started, we have put together a list of barndominium lenders who work with FBi Buildings.

Location is everything. The land you decide to build upon was selected for a special reason. Whether it has a pond on it for you to fish on, is close to work, has hunting land and no neighbors within a mile, or possibly it has been in your family for multiple generations and was handed down to you.
Whatever the reason, the next step in the building process is to prepare your land for utilities, access to the site, and construction. Every project is unique, and all sites have some work, big or small, before our crews can begin.
Below, we will discuss how to run utilities when building a pole barn and how to prepare your site.
In 2024, land costs an average of $16,000 per acre in America. Check with a real estate agent in your area for local properties and pricing.
Property Utilities
Utilities can cost tens of thousands of dollars, so having a plan and understanding all that goes into them upfront will prepare you to avoid having too many surprises during construction.
Consider whether there is currently electrical, water, or septic existing on the property. How far away would any utilities need to run? These can be factors that either increase or decrease your project cost.
Electrical
First, let's discuss electricity. As mentioned above, some loans require a licensed electrician for this. However, some customers have had an electrician run the electrical to the pole barn home and set up the breaker while the customer ran the wiring for outlets and lights.

One important difference between wiring a post-frame building and a stick-built home is the difference in wall cavities. In a stick-built home, electrical wires are usually run through the hollow space between wooden studs in walls, typically attached to the studs with nails. The wires usually run horizontally, about an inch into the wall and 16 to 18 inches above the floor, in line with outlets.
The advantage of post-frame construction is that it is flexible. Depending on your local code, you can run wiring along the top of the girts. This eliminates having to drill through studs like in traditional stick-built construction. This not only saves time and money in labor but also has no structural impact.
In post-frame, the columns are spaced 8' on-center, so you will need to think through where you want your outlets, how many, and where they will fall in the floor plan. Typically, you would run wiring to an outlet every four to eight feet.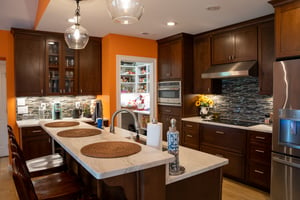
When it comes to your kitchen, how many outlets do you want around your countertop? Are you using a gas or electric stove?
Next, think about your ceiling. There are several options to choose from. Are you going to have a metal ceiling liner package or cover the trusses with tongue-and-groove boards? For a more traditional look, you can cover the ceiling with sheetrock. For a more open-concept look, consider exposed trusses.
Then, consider how many light fixtures are in each room. Do you want can lights, ceiling fans, etc? Before installing the ceiling, electricians must run the wiring and housing for light fixtures.
Electric can cost several thousand to $40,000+.

Plumbing
When it comes to plumbing, you will want to think through where all the water should go. Do you want pipes to run in the concrete or inside walls for a two-story barndominium? Remember that the placement of pipes is vital to ensure they don't freeze. If you run any in the exterior walls, ensure enough insulation to prevent frozen pipes.
Next, consider your septic system. Are you tying into an existing system, or do you need to install a new system? An important consideration when it comes to septic is the slope of the pipe.
The slope will impact your overall site plan elevation and any additional site prep work that might need to be done. If your septic is too steep, the liquid will outrun the solids. If it is not sloped enough, it will not drain properly. Typically, the sewer code is ⅛” - ¼" drop per foot.
Plumbing can cost $20,000+ depending on the size and scope of your project.
Heating and Cooling
Our service area covers most of the Midwest. That means our customers must factor in what heating and cooling they want to regulate their barn's temperature. While pole barns are known to be more energy efficient than traditionally built homes, how you insulate plays a big factor in efficiency.
Having an HVAC technician install your system is strongly encouraged. They can accurately recommend a unit appropriately sized for your space and ensure it runs frequently enough to keep your humidity under control.
Many of our customers choose radiant heat, a popular option that consists of a water heater hooked up to PEX tubing running underneath your subfloor or concrete slab. The hot water warms the water that runs through the tubes, and the concrete acts as a thermal mass to retain heat.
Depending on the size and scope of your project, you can pay anywhere from $7,000- $25,000+. While this is a large upfront cost, long-term savings can be significant.

Some of the benefits of radiant floor heating include:
More efficient than forced-air heatingEliminates duct losses
It doesn't distribute allergens like forced air systems can
Heating and cooling can cost $20,000 - $30,000+ depending on the type of system you select and the liveable square footage.
Internet
With the rise of technology, we are more reliant than ever on the internet. When building a pole barn home, you will need to investigate what internet providers are in your area.
Some argue that metal roofs block cell phone signals. You may need to consider a shingled pole barn home if this is a big concern of yours, but rest assured, if you choose a metal roof, you can most certainly still get internet access.
If you are like the 12% of Americans who work fully remotely, you will need to investigate your internet options and ensure you will have adequate coverage.
Access to the Building Site
Once you have figured out the utilities, your next step is accessing the building site. You can choose from six types of driveways. We recommend gravel or concrete.
While this might be something you think you might need later in the project, consider how semis will be dropping off lumber, trusses, equipment, and supplies. You will also want to ensure your driveway is wide enough.
Just a dirt driveway or a poorly planned gravel driveway could leave drivers stuck in the mud, resulting in rutting. Furthermore, crews who get themselves or their equipment stuck in the mud waste time and, ultimately, money. This can be avoided by planning your driveway and prepping your site properly.
Ensure that you have enough gravel to access your site and the perimeter of the pole barn construction area. Some equipment may require a 40' turn radius to get in and out of areas, so trimming branches or removing trees may be required. You also need to select a staging area where construction supplies can be dropped off.
Another element to consider is water management. Will you need a culvert to go under your driveway? The last thing you want is to come home and be unable to cross your driveway due to flooding.
Depending on the material you choose, a driveway can cost an average of $1.50 - $9 per square foot.
Site Preparation
 Site prep is the work done on your land before construction–finalizing location details, gaining access to the site, drainage, and more. This process allows you to identify and address site complications before construction begins.
It's designed to prepare you and your building for success. Although it requires more work upfront, if done correctly, it can potentially save you time and money.
Problems are much easier (and cheaper) to correct before equipment and schedules are involved.
To save money, will you rent an excavator to prepare the building pad, remove any trees or foliage in the way, and prepare the site elevation? Or will you hire a local land improvement general contractor?
When you pick land, consider a more flat area to avoid added excavation costs.
There are seven factors to consider when preparing your site.
Depending on the amount of work your site needs, you can expect to pay $500- $5,000.

E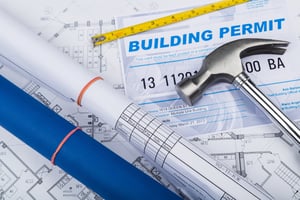 ach county has different rules for pole barn home permits. Some more rural areas are more lenient, but permits are still necessary to build. Permits will determine any setbacks, zoning criteria, and building use requirements.
A free service FBi Buildings provides for its customers is our in-house Pre-Construction Coordinator. Our Coordinator will work with you and your county to help pull necessary permits and assist you with this phase of the building process.
Keep in mind that you may also need permits for:
- Septic
- Roadway access
- Drainage
- Electrical
- HVAC
- Plumbing
Pole barn home permits can range from $50- $1,000.
Building a custom pole barn home is an investment. Most customers build a barndominium as their forever home to raise a young family or retire in. It is essential to have a well-thought-out plan to avoid buyer's remorse.
In this section, we will dive into the nitty gritty of barndominium floor plans and overall home design.
Floor Plans
Did you know the average American home is 2,299 square feet? When it comes to pole barn homes, we have seen customers who want only around 1,000 square feet of living space and the remainder to be more shop-focused, while others have opted for 3,000+ square feet of living area space.
The benefit of post-frame construction is the flexible design and clear span trusses that don't require load-bearing walls. Pinterest has many design ideas, and there are several companies from which to select a barndominium floor plan.
Often, if you find a general layout, whether a two-story barndominium or ranch-style shophouse combination, you can make some alterations; that is the beauty of post-frame; architect-approved drawings are highly encouraged, and some permits may require them.

Foundation
A solid foundation is key to building. There are multiple foundation options to consider. It is important to factor in your budget and consider your site. Would a walk-out basement work, or would a mixture of concrete and gravel be better?
1) Basement
We are often asked if a barndominium can be built on a basement. Just like a stick-built home, a barndominium can be built on a basement. You can select between a full basement, a half basement, or a walk-out basement. Barndominiums provide shelter from Midwest tornadoes, storage for Christmas decorations, and additional living space.
However, basements can run the risk of flooding, lack natural daylight, and are pricey. If having a basement is something your home must include, make sure you double-check the flood plains in your area. The last thing you would want to have happen is a basement that collects water.
A basement can cost roughly $33 per square foot.
2) Crawl Space
Similar to home construction, a barndominium can be built on a crawl space. This would allow for electrical wires, plumbing, and HVAC to run underneath.
Building a barndominium on top of a crawl space allows you to add extra insulation below the ground floor. The additional insulation may improve your home's energy efficiency, helping to reduce heating and cooling costs.
A crawlspace can cost $6 to $12 per square foot.
3) Concrete Pad
A concrete slab pad is the most common pole barn home option. It is the most affordable option and requires minimal excavation and backfilling.
But just because it is a slab does not mean it is boring. Some customers have stained and polished their concrete, and others have had certain parts stamped to look like wood flooring.
A concrete pad can cost $4 to $10 per square foot.
4) Pier and Beam Foundation
Another option is a pier-and-beam foundation. Think of a dock and the thick columns in the ground. A pier-and-beam foundation is similar in that anchors are secured to the ground and placed strategically along the perimeter.
These piers support the house and transfer its weight to the ground. The piers are then connected to the house by a series of wooden beams, which create a crawl space beneath the house. This design allows for better ventilation and easier access to plumbing and electrical systems.
Some post-frame engineers will argue that the pier and beam are not as secure as our columns that are in the ground. The dirt compacts and secures our columns to avoid any uplift of the building.
You can expect to pay $8,000- $22,000 for a pier and beam foundation
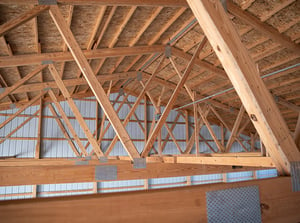
Truss & Columns
Speaking of columns, what sets post-frame apart is the column-to-truss connection. In addition to supporting the roof and connecting one side of the building to the other, trusses are a key component of the load path. They must handle all of the loads applied to the roof via the roof steel and purlins and transfer those loads effectively to the columns.
Depending on the type of ceilings and overall floor plan will determine the different type(s) of trusses and roof style you will pick from.
Rafters
Rafters are commonly used when you want to maximize the space of a structure. For example, if you’re looking to have steeply vaulted ceilings or extra storage clearance, you’re building a pole barn.
From a construction method, rafters can be single or double-ply. They only use one framing member (there is no bottom chord or webbing). Rafters can be used in the primary structure (meaning no trusses). However, if you decide to use rafters as your primary support, you will need additional headers or interior supports.
Pole Barn Trusses
A truss is the rigid framework of wooden members designed to support a roof. Trusses are comprised of a top chord, a bottom chord, and webs connected at the joints with plates.
The actual truss profile, spacing, span, heel height, pitch, overhang, and web configuration are dependent on the specific design conditions and will vary by application.
 Common Truss
This truss is perfectly symmetrical; it has a peak at the center and the same pitch and heel on both sides.
The pitch refers to the angle at which the truss slopes or inclines. Pitch is an important design component because it determines the stability of the roof structure.
The heel is at the end of the truss or near the bottom. This element also helps to provide stability, supporting the whole truss system.
Different trusses are to be used on one job, depending on architectural requirements. A regular truss is generally used for buildings with standard roof designs.
If we consider pricing, a common truss tends to be the least expensive option.
 Scissor Truss
While a regular truss has a horizontal top and bottom chord, a scissor truss has a sloping top and bottom chord.
A scissor truss is often used for buildings with vaulted ceilings, allowing for an open interior appearance. Even with a visually appealing aesthetic, the roof system's structural integrity isn’t compromised.
Scissor trusses tend to be slightly more expensive due to their larger chords.
 Mono Truss
Mono trusses can be found in buildings with a one-sided roof, like lean-tos. Due to their purpose, mono trusses slope in only one direction. Think of this style as “half” a common truss.
In certain scenarios, mono trusses can vary in pitch height. “Vaulted mono” trusses are used for multi-level roof lines or vaulted ceilings.
When looking at pricing, a mono truss is comparable to a common truss. Though, if the mono truss has a low pitch, it could be twice as expensive.
Other Miscellaneous Costs
After consulting your financial situation to determine what you can afford, it is important to consider all costs associated with your project. FBi Buildings, like most post-frame construction builders, will provide you with the shell price.
From there, you will factor in the utilities and the finishes. The interior and exterior features you select can make a big difference in the overall appearance and budget. There are several ways to build a cost-effective pole barn. One of the biggest budget line items is the kitchen and bathroom.
 Some popular upgrades our customers select include:
- Adding a porch with cedar or steel-wrapped columns
- Adding extra windows
- Adding a covered entry or portico with cedar columns
- Adding multiple garage doors
- Adding dormers to look more residential
While these are all great options to add, we've had customers spend a couple thousand in windows to over $100,000. The same is true regarding overhead doors. While this is something FBi Buildings does not install, your Project Sales Consultant can refer to some reputable companies.
You might also want to consider hiring an interior designer. They can help you navigate the latest home trends or curate a design that matches your style. They can make a simple barn wow guests with the right finishes and home decor pieces.
An interior designer can cost $1,500-$12,000.
Design Elements Your Barndominum Must Have
When creating your floor plan, you must also consider the four must-haves that all barndominiums must include. These factors include protection from water, how you maintain air control, thermal transfer, and vapor control.
While these may be less glamorous or fun areas to spend money on, if not properly planned out, you may have to spend thousands of dollars either later in construction or repair or renovate from mold or other problems you might encounter.
1) Protection From Water
To keep your barndominium dry and well-protected, focus on the following aspects:
 Roofing and Siding: To prevent leaks, use high-quality materials for roofing and siding. Metal roofs and sidings are popular, but shingles and other options like brick, stone, or vinyl are also available. Enhance the aesthetics with stone or metal wainscoting.
- Window Flashing: Install flashing around windows and doors to protect against water damage, mold, and wood rot.
- Building Wrap: Adding building wrap between the siding and framing protects against air leaks and water damage, improving energy efficiency and saving on costs.
- Drainage: Proper site preparation and drainage are crucial. Ensure the residential building is elevated, and water runoff is directed away from the structure using downspouts and tiles.
Choosing a builder with in-house engineers, like FBi Buildings, ensures your structure meets high standards and is built to last.
2) Air Control
To manage air control in your pole barn and enhance energy efficiency, consider the following options:
- Zip System: This method uses all-in-one panels with integrated foam insulation that provide thermal, air, and water resistance. It eliminates the need for building wrap and offers a consolidated workflow, but requires a higher initial investment and careful sealing of panel holes to prevent leaks.
 Building Wrap + Tape: Building wrap combined with tape helps prevent air and water leaks and keeps out drafts. However, it might not completely seal areas punctured by nails.
- Building Wrap + Spray Foam: Spray foam insulation offers a tight, impenetrable seal and high R-value, effectively reducing air leakage and enhancing energy efficiency. It’s the most expensive option but provides the best insulation and moisture protection.
Each option has its trade-offs, so choose based on your budget and insulation needs.
3) Thermal Transfer
Thermal Transfer refers to the movement of outdoor air into your space, affecting climate control. To mitigate this, high-quality insulation and airtight construction are essential. When selecting the type of ceilings you want, you must also consider what insulation type will work best.
- Wall Cavity Insulation: Options include spray foam, batt insulation, vinyl back, and rigid board. Building wrap, while not an insulation itself, can act as an optional convection barrier.
- Attic Insulation: Proper attic planning and ventilation are crucial since heat rises and can cause damage. Install a vented ridge cap and 12" or 24" overhangs to regulate temperature and moisture, protecting your home's structure and enhancing energy efficiency.
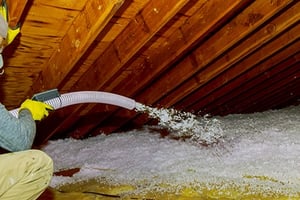 Flat Ceiling: Popularly insulated with blown insulation, which provides an air-tight seal. Recommended R-value is R-38 (10 to 14 inches). Ensure proper ventilation with a vented ridge and soffits to manage moisture and maintain efficiency.
- Vaulted Ceiling: Offers a spacious feel but limits insulation options to spray foam, batt insulation, or ridge foam boards. Spray foam, while effective, is more costly. Consider the increased HVAC requirements due to the larger volume of space.
4) Vapor Control
Vapor Control is essential to prevent mold and mildew caused by excess moisture from activities like breathing, showering, and cooking, especially in humid conditions.
 Ways to Control Vapor:
- Dehumidifiers: Use standalone dehumidifiers or integrate one with your AC unit to reduce moisture.
- Houseplants: Plants like English ivy, Boston fern, and peace lily can help absorb excess moisture.
- Increase Airflow: Open windows, install exhaust fans in bathrooms, use a vented kitchen hood, and add ceiling fans to improve air circulation.
- Ventilation: Ensure ventilation systems expel warm, moist air rather than directing it into your attic. Utilize fans, open windows, and doors, install cupolas with fans, and consider mechanical ventilation systems.
Effective vapor control helps maintain a healthy indoor environment and prevents damage from excess moisture.
Now that you have a basic understanding of all the elements and a rough estimate on the cost to build a barndominium, the next step after getting all your project details is understanding the construction phase.
Unless you are building a DIY pole barn kit, you need an experienced team of craftsmen. Not all pole barn builders employ their construction teams; many subcontract labor. The downside of to this is project delays and inconsistent training.
FBi Buildings has over 40 crews, with crew leadership with decades of construction experience. Many builders are responsible for building the building from the ground up. Some do the site prep or concrete work, while others partner with local contractors to assist homeowners.

General Contractor
One way to save money is to be your own general contractor. In this role, you will align all of the subcontractors and keep the project on track. One day, you might be meeting with FBi Buildings, and the next day, with your plumber. You can expect to save 15-20% by being your own general contractor.
While this might seem like something you wouldn't mind doing, you must ask yourself how much time you have to devote to your post-frame construction project. If you have a job where you work 8-5 and can't leave, this can prove to be challenging. If you have a more flexible work schedule and can meet with a contractor midday if issues arise, being your general contractor might be a good fit for your project.
The other caveat is to analyze your skillset. A seasoned general contractor can provide solutions and use past project experience to help guide your project in the right direction. An experienced general contractor can save you time and money by knowing permitting codes, typically having an understanding of structural engineering, and quickly addressing problems as they arise.
Whichever way you choose, a general contractor becomes an important contact for FBi Buildings and yourself to rely on meeting project deadlines.
As you can see, there are multiple factors to consider when determining the cost of your pole barn. There is no black-and-white square foot number that works for everyone. To get a total project cost, you have to start with step one and work your way forward. Ultimately, how you choose to design your building is up to you. Your builder should walk you through each one of the steps listed above to help get your project started, on schedule, and under budget.
If you’re ready to start and take the next steps with your building project, call (800) 552-2981 or reach us online to determine your pole barn estimate.