Posts | Building Tips | Building Design
How to Design Your Pole Barn Online
Angie joined FBi Buildings in 2012 and is now the Director of Marketing. She's an avid reader and enjoys outdoor leisure and cheering on her two daughters at their sporting events.
Arguably one of the most difficult decisions of building a pole barn is trying to decide your buildings floor plan. Sure, picking out building colors and deciding what interior and exterior features you may need (or essentially want) is also challenging.
It’s also not uncommon for customers to second guess themselves on what size of post frame building they need. The last thing that you would ever want to happen is to run out of storage space. But, if that is a problem you are currently facing (or budget restrictions won’t allow you to get the size you want), we do design and build pole barn additions. Sometimes you weren’t planning for your business to take off like it did (which is a good problem to have). Instead of building a brand new post frame structure, some of our customers prefer to add on to the building they currently have. Right or wrong, a pole barn addition is simply your own personal preference. Either way, we can help you out.
All of these are common problems that occur with our customers. As exciting as post frame construction is, it can also be challenging at times. Your mind is probably racing with a bunch of floor plan ideas that you think could work with your property, but you also want to make sure that you have an open floor plan because of its design flexibility. This is especially important if your building’s primary use is going to be used for retail spaces.
If you’re unfamiliar with the benefits of post frame building design, be sure to check out our blog on post frame buildings vs steel frame. We compare and contrast the two different types of buildings and explain why (in our opinion) post frame is a better decision for commercial buildings.
Not only is it a better decision, but it’s also a cost-effective decision. Saving money while also getting the building you want? That sounds like a win to me.
However, what if we told you that designing your own pole barn is a fairly simple process? Sure, you can still use pencil and paper if you prefer, but if you had the option to use a pole barn design software...would you?
What if we told you that it’s free? What if we told you that you can save your plans and come back whenever you want to edit your design? Would you be interested?
Now that we have your attention, let’s get started.
How to Design Your Pole Barn Online: 8 Easy Steps
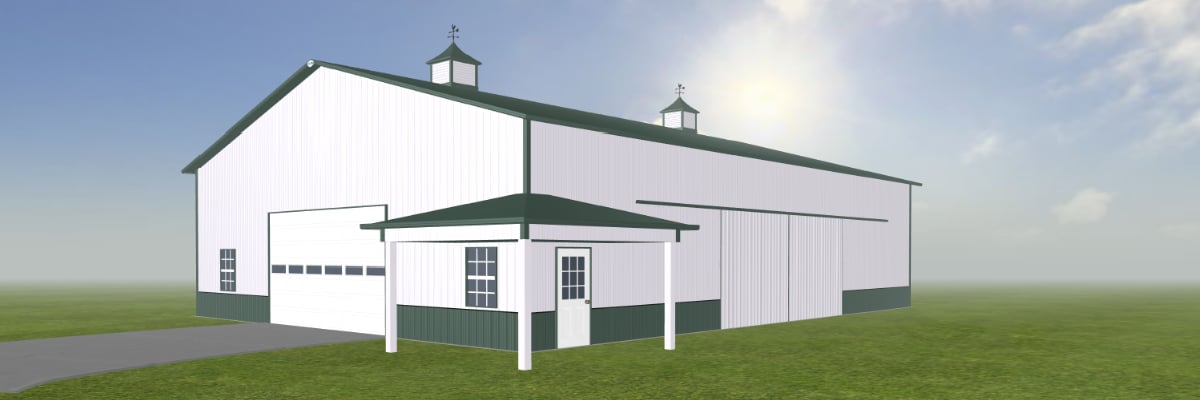
If you aren’t familiar with our new and improved design online tool, we recommend that you check it out now. It helps you take the guesswork out of choosing the right building size and location for your business, farming operation, horse barn, or garage. Not only are you able to design your own custom post frame building, but you can also determine door and window placements, exterior finishes, and color choices. Our latest update includes designing the interior of your building.
.
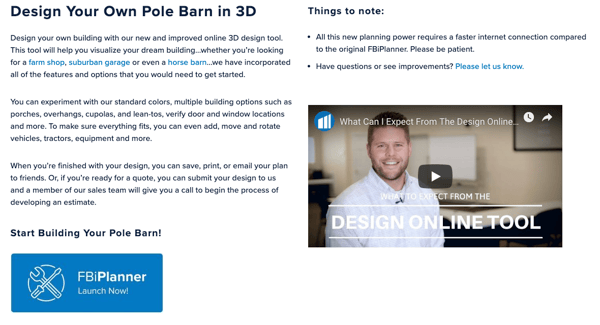 Step 1: Launch the Planner
When you’re ready to design your building online, visit our Design Your Own web page. From there, you’ll see a video from Blair Neihouser, our Vice President of Sales, who will explain to you what to expect from using this tool.
Once you are ready to get started, click on the ‘FBiPlanner Launch Now’ button. You’re now ready to get designing!
Please note that all of this new planning requires a faster internet connection. Please be patient if you’re experiencing slow load times.
Step 2: Building Dimensions
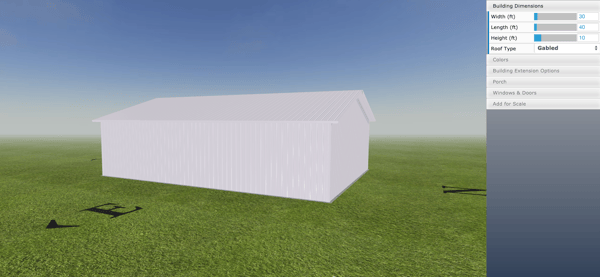
When your planner launches, the first step you will want to take is to pick out your building dimensions and roof type. If you haven’t decided (or can’t decide) you’ll be able to get a real-time view on:
- Width
- Length
- Height
- Roof type
Simply type in the dimensions that you need or use the blue bar to adjust the dimensions. You also might notice that if you type in 32’ for the width that it will automatically adjust to 36’. That’s because the width of our buildings are based on 6’ increments and the length is based on 8’ increments. The same thing will happen when you try and choose a building height.
But don’t worry...when you submit the building for a quote, just type in the comment box what size you’re really needing.
Step 3: Select Your Colors
Once you’ve finalized the building dimensions and roof type, it’s now time to pick the colors of your building. In this step you will be deciding on:
- Roof color
- Wall color
- Trim color
- Wainscot color
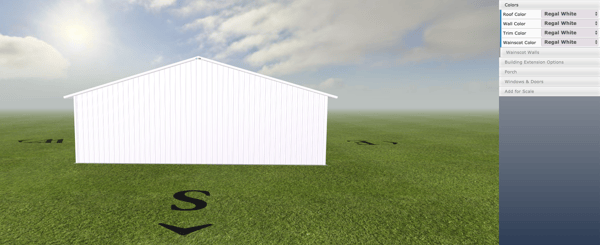
Just like the building dimensions, the colors that you choose will be shown in real time view. Depending on what browser you’re using, you’ll be able to see your color options before selecting them.
If you don’t want to choose a color for the wainscot, you will also have the option to choose brick or stone. During this step, you’ll also be able to choose which walls you want to have wainscot on.
It’s important to note that our standard height for wainscot is three feet. If you want to choose a different height, then that needs to be noted in the notes section before you submit your building for a price. Congratulations….you’re halfway there in designing your post frame building!
Step 4: Building Extension Options
During this step, your building starts to come to life. Step 4 will allow you to choose your:
- Overhangs
- Cupolas
- Eave lights
- Lean to
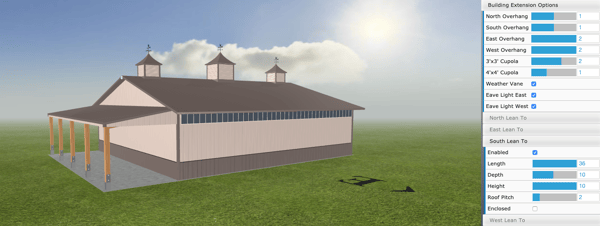
By default, you can choose from one foot or two-foot overhangs. The north and south overhangs are simply for aesthetics and offer no ventilation value for the building. Most of our customers choose one-foot overhangs for the east and west walls, but some will choose two-foot overhangs. If you’re looking to keep the cost down, then we recommend going with one-foot overhangs.
You can also choose how many cupolas you want. By default, if you select two, three-foot cupolas and one, four foot it will automatically place the four-foot cupola in the center of the building. The same is true if you decide to do one or two cupolas of either size...they will automatically be placed centered within the roof. If you decide you want to top of the cupola with a weathervane, then you have the option to check that box if you so choose.
If natural light is a must for your building, then you can also check the boxes for east and west eave light.
The last thing you’ll want to decide in step 4 is if you want any lean-tos. For example, let’s decide that you want a lean-to on the south wall of your building. You’ll select ‘South Lean To’ and check the box for ‘Enabled’.
Similar to the building dimensions, you’ll have the option to choose your:
- Length
- Depth
- Height
- Roof pitch
If you prefer to have your lean-to closed and not open, you will want to check the ‘Enclosed’ box.
Once you’ve finalized this step, the next step will be figuring out porch details.
Step 5: Adding a Porch
This step may or may not pertain to you. Some of our customers want porches included with their building and some of them do not. It all boils down to your personal preference and what you want your final building to look like.
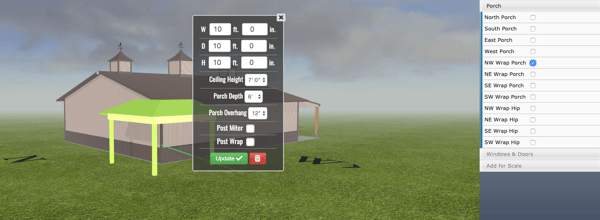
If you decide to include a porch, it really is as easy as checking what type of porch you wish to have. You can choose from:
- A standard porch
- A wrap porch
- A wrap hip porch
For this example, I went ahead and selected the Northwest Wrap Porch. Once your porch is in place, you simply double click on the porch and it will bring up the ‘Edit Box’. Within this box, you have the option to edit the porches details.
When you’re done editing the porch, all you have to do is hit the green ‘Update’ box and your changes will be saved. You’re getting so close to finalizing your building. The next step will be adding windows and doors.
Step 6: Adding Windows and Doors
If this step doesn’t pertain to you, then you can jump to step seven. If you choose to add windows and doors to your building, you’ll want to stay on this step.
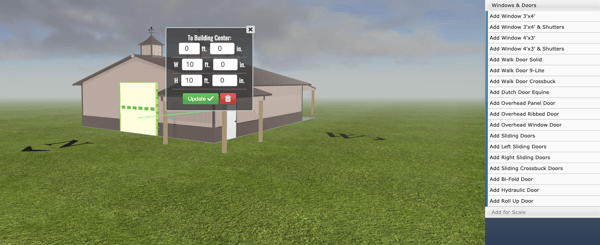
As you may or may not know, there are a wide variety of window and door options for you to choose from. For example, you can select:
- 3x4 window
- 3x4 window with shutters
- Solid walk door
- 9-lite walk door
- Dutch door
- Overhead window door
- Sliding door
- Etc
For this particular pole barn, let’s say we want to choose a solid walk door and an overhead window door. I would select both options, place them in their desired location, and change any dimensions (if necessary) by double-clicking on the object.
We’re in the home stretch now! Just a couple more steps and we will be finished.
Step 7: Finishing the Interior & Adding Items for Scale
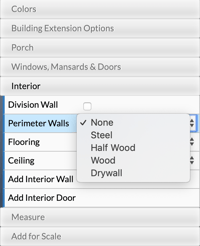 Our newest update includes finishing the interior of your building. You can finish the interior of your pole barn by selecting 'Interior' and selecting from the following options:
- Division wall
- Perimeter wall
- Flooring options
- Ceiling options
These options allow you to see what your pole barn would look like if it were finished. The wall materials you can choose from are:
- Steel
- Half wood
- Wood
- Drywall
The flooring and ceiling materials that you can choose from are:
- Ceramic tile
- Wood
- Carpet
- Steel
- 2x2 tile
If you’re interested in figuring out if the building you designed will be big enough for your needs, then this is the perfect step for you.
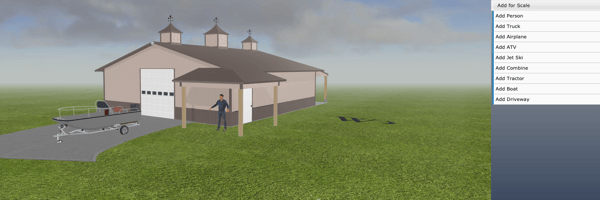
You currently have a handful of options to choose from, such as:
- Person
- Truck
- Driveway
- Boat
- Combine
- Household items
- Etc
All you have to do is select the item you want to add for scale and move that item to where you want it placed. See below for my example. And then we’re on to the last step!
Step 8: Print, Share, Save & Submit
Congratulations! You’ve made it to the last step of designing your pole barn online. You have a variety of options during this step...some you may use and some you may not.
If you want to go back to your design at a later date (because you still don’t know if you’re really finished) then we recommend hitting the ‘Save’ button. A box will pop up for you to input your email address and you will be emailed a link of your building.
You can also ‘Share’ this building with your spouse, family, or friends. All you have to do is hit the ‘Share’ button and fill out the box for who you want to share your building design with.
When you’re ready to get a quote, all you need to do is click on the ‘Submit this Design for a Free Quote’ button. You will fill out your contact information in the pop-up box and your design will automatically be sent to our Customer Engagement Team. You will also be sent a follow-up email with a link to your building design.
Design Your Building
There you have it! The eight steps that you need to know in order to design your pole barn online. For some of you, you might not need to take all of the eight steps while others will be back more than once making edits to their building.
Have more questions about open-sided buildings not covered in this article? Please contact FBi Buildings at 1.800.552.2981 or click here to email us. If you’re ready to get a price, click here to request a quote and a member of our sales team will call you.
