


It’s the time of year that most people look forward to...nice weather! The days are getting longer, and the temperatures are warming up.
Unless you live in the Midwest (like us) because Mother Nature loves to play tricks. Regardless, you can finally start working on the long list of outside projects, such as landscaping.
For some, it’s that time of the year where you may notice water drippage from the trusses of your pole barn garage or farm shop.
What is pole barn condensation?
Water vapor condenses when warm, moisture-laden air contacts a cooler surface (e.g., the underside of your roof steel). Since lower-temperature air cannot hold as much moisture as warmer air, the excess humidity turns into water droplets. Then...drip, drip, drip!
However, you can minimize condensation by reducing humidity levels within the structure.
It’s no surprise that your post frame building is experiencing condensation. After all, that’s a common phenomenon, right?
But, what if we told you that condensation can be prevented? In this article, we discuss the proactive steps you can take to properly manage condensation in your pole barn.

5 Tips to Help You Manage Pole Barn Condensation
There are several ways to manage condensation, and it all starts at the very beginning of your post frame project.
1) Site Preparation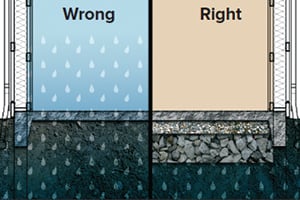
Proper site preparation is the cornerstone of condensation control. The objective is to set your building on a solid surface and to establish the right finished floor elevation (FFE), so your structure stays high and dry.
Typically, the first step in site prep is to remove all humus and sod. If this organic matter is not removed, it will decompose, causing your concrete or asphalt to settle and crack.
Fill should be applied one layer at a time and compacted to ensure a non-settling crowned surface. A layer of coarse stone over the soil base creates a capillary break and helps drain water away. Poor groundwork can create capillary action and lead to serious moisture problems inside your building.
If fill material was added to your site, it likely contained moisture. The wet fill material can hold up to 15 pounds of water per cubic foot. This can take at least six months or more to dry out completely.
Although site preparation costs a little more upfront, it’ll save you money (and headaches) in the long run. When done right, your post frame building will last longer, need less maintenance, and require less energy to heat/cool.
2) Drainage
Now that your building is set high and dry, you should consider having gutters and downspouts installed. Most pole barn builders will offer these standard features.
Proper drainage helps you manage the water flow that’ll come off the roof and send it away from the structure to a location of your choice. Many customers choose to run their downspouts into tiles that drain into remote ditches or ponds. Wherever you go with it, the key is to channel rainwater runoff away from your building.
3) Other Moisture Surfaces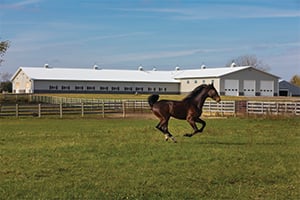
Other factors that can increase interior humidity, and thus condensation potential, include:
- Livestock (e.g., horses and manure)
- Non-vented furnaces
- Propane heaters
- Greenhouses
- Thawing snow from vehicles
- Water puddling at the exterior perimeter of the building
Always remember that sources of moisture are additive, so even small sources can add up to a problem. Sometimes the source of moisture is inside the building.
The most common, although temporary, problem is concrete. Freshly poured concrete is 16% water. As it cures, that water is released into the inside air. It does so at a rate of .1 pounds of water per square foot per hour (in an enclosed, wind-free environment).
This rate drops as concrete cures; concrete is substantially cured within one month of being poured.
4) Ventilation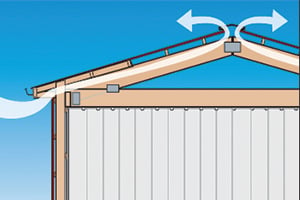
Next, ventilation goes a long way towards accomplishing condensation control. Overhangs with ridge vents at the roof peak pull warm, moist air out of your pole barn and replace it with fresh air, dry air.
Adding a cupola to your structure will allow a way for trapped heat to escape through the fan and side vents. For a personalized touch, you can top it off with a weathervane.
Cupolas are a great ventilation feature if you’re building a horse barn. Moisture from manure will be able to rise and exit the structure. Thus, improving the indoor air quality for you and your horses. Say goodbye to musty air!
It seems evident, but doors and windows are standard building features that encourage air movement. But, it requires someone to monitor the situation and open/close them as needed.
Whichever way the wind blows will determine the doors and windows you’ll want to open for the best ventilation. We recommend even distribution for better results.
Also, mechanical ventilation controls the air movement by using one or more fans. It isn’t commonly used for post frame buildings because it increases initial, operating, and maintenance costs.
Depending on the location, site issues, and intended use, ventilation alone may not be enough to keep condensation at acceptable levels.

5) Roofing Backer Options
Furthermore, roofing backer options are an additional way to help manage condensation. It’s important to note that these options are supplemental to other preventative measures discussed above.
There are five types of barrier options that we recommend for our post frame projects:
A) Thermax® Insulation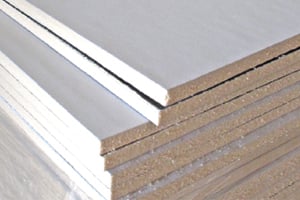
Physical vapor barriers, such as Thermax®, are installed under the roof sheathing. These rigid panels of insulation prevent humid air from contacting cooling steel.
A rating known as an R-value measures an insulation's resistance to heat flow (also known as conduction). The higher the R-value, the higher the resistance to heat loss.
Thermax® provides a very high R-value with continuous coverage. The seams are taped to avert moisture. As a result, there is less air infiltration.
B) Vinyl Back Insulation
Vinyl back is a fiberglass batt with white coating. It’s an inexpensive alternative to Thermax® insulation.
In order for vinyl back to work properly, each lap must be sealed. This adhesive keeps insulation from getting wet, which lessens its performance and contributes to its deterioration.
Moreover, vinyl back can be a challenge to install properly; therefore, quality control is paramount. The R-value varies by thickness.
C) OSB with Felt Paper on Top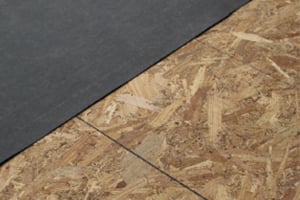
Oriented Strand Board (OSB) is made from compressed layers of wood. It’s not to be confused with a particle board. OSB adds tremendous strength to the pole barn.
Not to mention, birds cannot damage the wood panels. However, it provides little R-value.
Then, a 15-pound felt paper is installed on top of the OSB. Again, it’s lapped for moisture protection, similar to that of a shingled roof. Due to the non-reflective wood underside, some customers feel that it darkens the interior building.
D) MoistureLok
This rubber and polyester membrane traps moisture in small pockets and releases when conditions are below the dew point.
Please note that adding MoistureLok to the underside of your roof steel may void the manufacturer’s warranty. Before adding this barrier, you should double-check all coverages, conditions, and exclusions.
Additionally, the membrane must be cleaned regularly to keep the pockets from clogging. Due to its wicking action, MoistureLok shouldn’t be used on roofs that require overlapping steel to cover the eave-to-ridge length. We recommend using treated barge board or drip edge trip to avoid water damage.
E) Bubble Wrap Insulation (or Radiant Foil)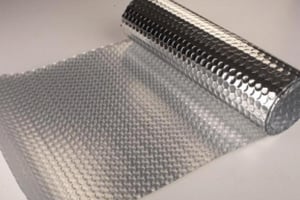
Bubble wrap is also an option, but not one that we recommend. In order for bubble wrap to work, it must be installed according to the manufacturer’s specifications...which rarely happens.
To be effective, there must be a ¾’’ air space between the roof steel and bubble wrap through the use of furring strips. Some contractors install bubble wrap underneath the steel and let it sag in-between the purlins. Unfortunately, this application is uncommon with post frame structures because of the cost and lack of condensation control.
Again, all of these roofing products can condensate, so they should be used in addition to other moisture materials.
Are You Ready to Learn More About Pole Barn Condensation?
Lastly, it’s important to select a pole barn builder who really understands the use, goals, and objectives of your post frame project. A knowledgeable company will be able to provide solutions that’ll compensate for building moisture.
As you can see, there are several ways to reduce the amount of water vapor that’ll naturally occur in your pole barn. The best way to control condensation is by taking proactive measures from the very beginning.
For more information, you can download our FREE “Proactively Managing Condensation” e-Book. Our recommendations are based on 60+ years of experience in the post frame industry.
Have more questions about pole barn condensation not covered in this article? Please contact FBi Buildings at 1.800.552.2981 or click here to email us. If you’re ready to get a price, click here to request a quote and a member of our sales team will call you.